stillleben
What can it do for me?
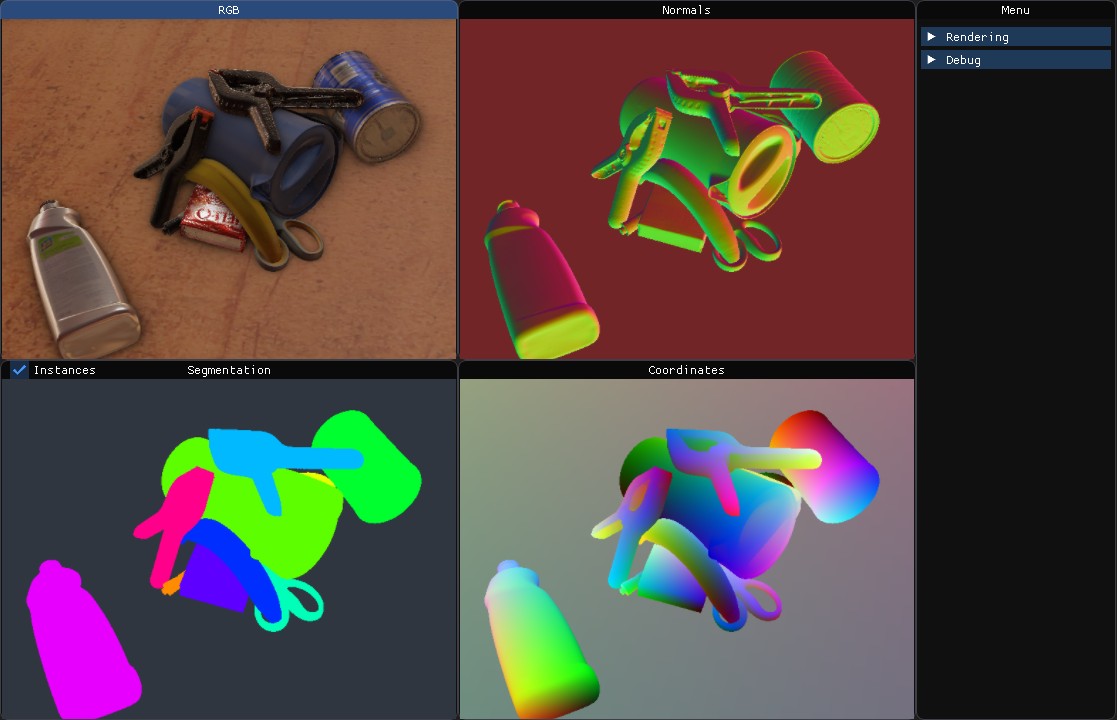
Stillleben generates realistic arrangements of rigid bodies and provides various outputs that can be used to train deep learning models:
- A rendered RGB image of the scene. Depending on the rendering settings, this rendering can be of quite high quality, in some cases photorealistic. The image can be imbued with noise using the stillleben.camera_model module.
- A depth image.
- Class-wise and instance-wise semantic segmentation of the scene.
- Camera- and object-space coordinates, highly useful for training methods that exploit pixel-wise correspondence.
- Camera-space normals.
Stillleben is highly integrated with the PyTorch deep learning framework. It can be used to produce training data on-line to save dataset generation time or to train methods that require interaction with the scene.
For scene registration and other applications we provide an approximative differentiation module in stillleben.diff which allows backpropagation of image-space gradients to object poses and shapes.
This page documents the Python API of stillleben. The Python API is a wrapper around the C++ core implementation.
Getting started
If you haven't already, go through the installation instructions.
Here is a short API example:
import stillleben as sl
import torch
import sys
import random
from PIL import Image

def view_mesh(mesh_filenames, ibl=None, serialize=False):
    # Load meshes
    meshes = sl.Mesh.load_threaded(mesh_filenames)

    # Meshes can come in strange dimensions - rescale to something reasonable
    for mesh in meshes:
        mesh.center_bbox()
        mesh.scale_to_bbox_diagonal(0.5)

        # Dump some object statistics
        obj = sl.Object(mesh)
        print("Object properties:")
        print(f" - mass: {obj.mass} kg")
        print(f" - density: {obj.density} kg/m^3")
        print(f" - volume: {obj.volume} m^3")
        print(f" - inertial frame:\n{obj.inertial_frame}")
        print(f" - inertia in inertial frame: {obj.inertia}")

    # Create a scene with a few of the objects
    scene = sl.Scene((1920,1080))

    for i in range(10):
        obj = sl.Object(random.choice(meshes))
        scene.add_object(obj)

    # Let them fall in a heap
    scene.simulate_tabletop_scene()

    # Setup lighting
    if ibl:
        scene.light_map = sl.LightMap(ibl)
    else:
        scene.choose_random_light_direction()
        scene.ambient_light = torch.tensor([10.0, 10.0, 10.0])

    # Display a plane & set background color
    scene.background_plane_size = torch.tensor([3.0, 3.0])
    scene.background_color = torch.tensor([0.1, 0.1, 0.1, 1.0])

    # Render a frame
    renderer = sl.RenderPass()
    result = renderer.render(scene)

    if serialize:
        print("\nSerialized scene:\n")
        print(scene.serialize())

    # Display interactive viewer
    sl.view(scene)

def view_scene(scene_filename):
    scene = sl.Scene((1280, 800))
    scene.deserialize(open(scene_filename).read())

    sl.view(scene)

if __name__ == "__main__":
    import argparse

    parser = argparse.ArgumentParser(description='Stillleben mesh viewer.')
    parser.add_argument('meshes', metavar='PATH', type=str, nargs='+',
                        help='The mesh file(s) to load',
                        default=str(SL_PATH / 'tests' / 'stanford_bunny' / 'scene.gltf'))
    parser.add_argument('--ibl', metavar='PATH', type=str,
                        help='IBL light map to load')
    parser.add_argument('--serialize', action='store_true',
                        help='Show serialized scene')

    args = parser.parse_args()

    sl.init() # use sl.init_cuda() for CUDA interop

    if len(args.meshes) == 1 and (args.meshes[0].endswith('.txt') or args.meshes[0].endswith('.scene')):
        view_scene(args.meshes[0])
    else:
        view_mesh(mesh_filenames=args.meshes, ibl=args.ibl, serialize=args.serialize)